
Have you listened to a home recording of your voice and felt “somehow it is muffled” or “the voice seems to be bouncing off the walls”? In many cases the cause is not the performance of the microphone but the echo (reverberation) of the room. This article sorts out the difference between soundproofing and sound absorption, and introduces easy ways to treat a room starting from a small budget. It also explains notes for rented homes.
Disclosure: This article contains affiliate links. If you buy through them, SoundBounty may earn a commission at no extra cost to you. Information is as of the date we checked it and can change.
Understand that “soundproofing” and “sound absorption” are different
Soundproofing (sound insulation) is hard to do yourself
Most of what is generally called “soundproofing” means, strictly, sound insulation. Insulation is a measure to reflect and block sound so it does not leak outside the room, or so outside sound does not come in, and it needs construction work such as putting heavy material inside walls or fitting double windows. In rented housing you basically cannot alter the walls or windows themselves, so it is not realistic for an individual to achieve, with off-the-shelf goods alone, insulation at the level of “not letting sound leak into the next room”.
What is realistic for home recording is “absorption”
On the other hand, sound absorption is a measure that keeps sound from reflecting inside the room and absorbs it, preventing extra echo from riding on the recording. The layer of air inside the absorbing material absorbs the vibration of sound and reduces reflections from the walls and ceiling. It does not stop sound leaking outside, but for the goal of improving the sound quality of home recording, absorption fits better. The point is to think of “soundproofing so as not to bother the neighbors” and “absorption to raise the quality of the recording” as separate problems in an apartment.
Where is acoustic treatment effective?
Behind the microphone and the side walls (the first reflection points)
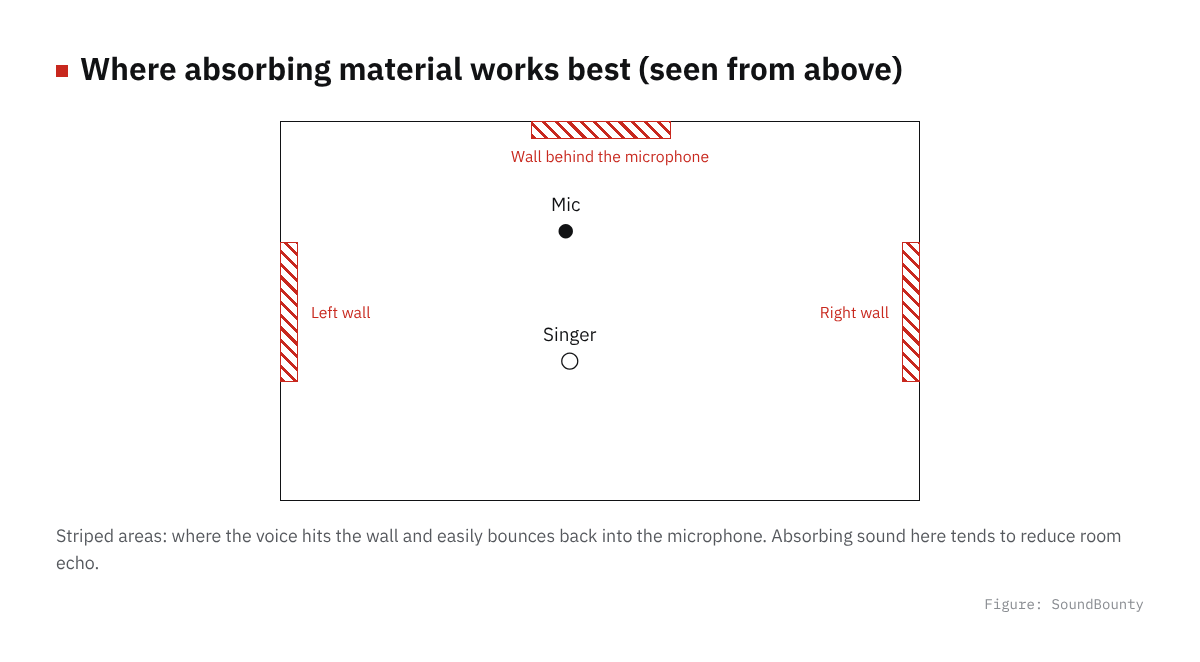
Figure: SoundBounty
A voice is recorded not only as the sound that reaches the microphone directly, but also together with reflections that hit nearby walls, the desk and the monitor speakers once and arrive later. The places to absorb first are behind the microphone (the wall in front of the singer) and the wall surfaces to the left and right as seen from the microphone. You do not need to cover all the walls; starting around the height of the microphone, in an area about the size of a person’s head, and widening little by little is said to be good.
The option of a reflection filter
If you do not have space to put absorbing material on the walls, or do not want to attach anything to the walls of a rental, a reflection filter (ambient room filter), which stands a semicircular absorbing panel behind the microphone, is an option. You can use it just by attaching it to the microphone stand, so an advantage is that you can reduce reflections without altering the room itself. A highly sensitive condenser microphone easily picks up surrounding reflections too, so it is a combination in which you can easily feel the effect of such measures.
Check the effect with monitor headphones
How much the echo changed before and after adding absorbing material is said to be easier to tell by comparing on monitor headphones than on speakers. The steps for actual recording and adjustment are explained in Basic steps for recording vocals at home, so check them too once you have finished treating the room.
Absorbing items you can start with at a low cost
These are the kinds of items commonly used. We do not give prices; check the current price at the store you buy from.
| Item | Features |
|---|---|
| Pyramid-type absorbing panels (small, such as 30 x 30 x 2.5 cm, sold as a set of four) | Small and easy to attach. For people who want to try only the first reflection points first |
| Pyramid-type absorbing panels (thicker, such as 30 x 30 x 5 cm, sold as a set of four) | Thicker than the thin type and said to absorb more |
| Reflection filter | Attaches to the microphone stand. You can set it up without damaging the walls |
Many absorbing panels attach with double-sided tape. Putting masking tape for protection on the wall first and attaching the panels over it is said to leave less of a mark when you peel them off. Trying just a few pyramid-type panels first, and adding more while checking where the echo bothers you, leads to fewer failures.
Absorption without spending money: a closet, blankets and curtains
Before you buy absorbing material, you can reduce echo with just what is in the house.
- Record inside a closet: clothes and bedding act as cushions that absorb sound, so putting the microphone inside a closet to record can greatly reduce echo. Open the door a little and pass the cable through, and try it while watching for a cramped feeling and noise (rustling clothes, the door’s metal fittings and so on).
- Lean blankets or futons around you: just hanging thick blankets or futons behind and to the sides of the microphone, or draping them over chairs or a clothes rack in place of walls, reduces echo better than reflections from hard walls.
- Thick soundproofing or sound-blocking curtains: curtains made by layering special fabrics are said to reduce reflections in the high range. When you record near a window, just closing the curtains is a point where the change shows easily.
You can try these for free or for a few thousand yen at most, so it is worth first checking how much changes in your own environment before you buy more absorbing material.
Notes when treating a rented home
In rented housing, avoid measures such as making holes in walls and ceilings or applying adhesive directly, because they can be subject to restoring the home to its original condition. Most absorbing material assumes attachment with double-sided tape, but to avoid trouble when you move out, ideas are introduced such as putting protective tape on the wall first and layering the absorbing material’s double-sided tape over it, or using removable adhesive hooks. Choosing products that can be removed without construction, such as gap tape and anti-vibration rubber, is also one way. If you are unsure, it is reassuring to check the rules for restoring the home when you move out in advance with the management company or your lease.
Frequently asked questions
Q. If I put up absorbing material, will sound stop being heard in the next room?
No. Absorbing material is for reducing echo inside the room, and the insulating effect of not letting sound leak through walls is a separate thing. For sources that are loud to begin with, such as singing loudly at night or acoustic drums, absorbing material alone cannot prevent sound leaking to the neighbors.
Q. How much absorbing material should I prepare?
You do not need to cover the whole room; it is recommended to try a small amount at a time, starting with places where reflections have a big effect, such as behind and beside the microphone. In music production, a state with no echo at all is called “dead”, but for recording vocals at home, you can often feel the effect without absorbing that extremely.
Q. Which should I try first, a reflection filter or absorbing material on the wall?
A reflection filter is easy if you do not want to attach anything to the walls of a rental, or want to use the room differently for streaming and recording. Conversely, if you always record from the same place in the same room, putting absorbing material on the walls tends to keep costs down more easily. You can choose by budget and ease of setting up.
Q. Which should I review first, acoustic treatment or the microphone?
If the microphone you already use is a unidirectional (cardioid) condenser microphone, trying acoustic treatment first tends to give better value for money. On the other hand, if you are considering switching to a dynamic microphone that picks up little environmental sound and echo to begin with, also check Dynamic vs condenser microphones, and it becomes easier to choose to suit your room.
Summary
The sound quality of home recording changes a lot not only with the microphone and audio interface but also with measures against room echo. First understand that soundproofing (insulation) and absorption are different, then start little by little from the places where reflections have a big effect, behind and beside the microphone, using what you have such as a closet and blankets, or an inexpensive absorbing panel or reflection filter; that is the approach least likely to fail. How to choose the microphone itself is explained in How to choose a condenser microphone, and if you want to put together a full set of gear, also refer to What you need to start DTM.


Comments